Arduino 二氧化碳感測器MG811 校正計算
==============================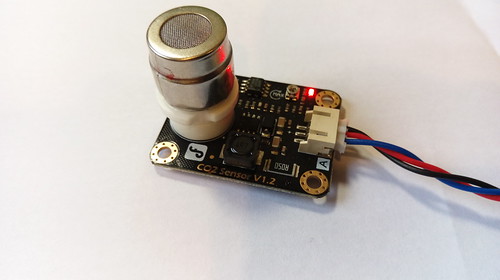
半年多前,幾個朋友都買了二氧化碳感測器,我也上網去買了一個MG811 ,可是買了之後,就沒再動過了。最近對空氣品質很感興趣,所以就把這個感測器挖出來,想要來利用一下。
接的方式很容易,感測器是類比輸出,所以就把Signal接A0,其他的紅線就接5V,黑線接Gnd。但這個氣體偵測器的內部需要加熱,所以arduino要再接上9V外接電源(至少需要7~12V,>500mA )
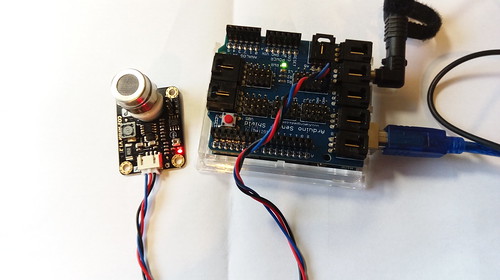
接好之後,用最簡單的程式碼就可以用arduino得到傳來的類比數值
==============================
void setup(){ Serial.begin(9600); }void loop(){ Serial.print("Sample value:"); Serial.println(analogRead(0)); delay(100);}==============================
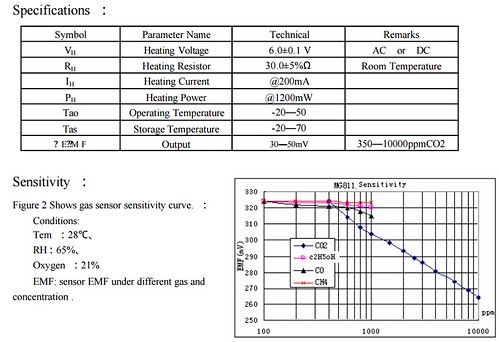
但問題是,這傳來的數值,要怎麼轉換成二氧化碳濃度?
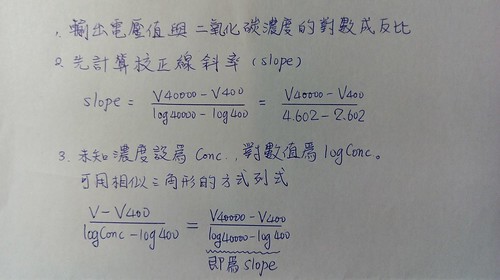
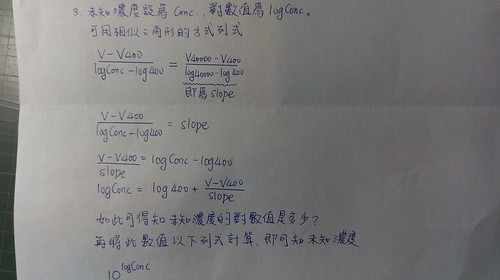
從Datasheet中可以看到二氧化碳濃度的對數值和輸出電壓成反比,所以我要作的事情有以下幾步。利用已知的二氧化碳濃度(至少兩個)得到校正線的公式,再把輸出電壓套進公式裡,就可以得到未知的二氧化碳濃度了。
從Datasheet中可以看到二氧化碳濃度的對數值和輸出電壓成反比,所以我要作的事情有以下幾步。利用已知的二氧化碳濃度(至少兩個)得到校正線的公式,再把輸出電壓套進公式裡,就可以得到未知的二氧化碳濃度了。
如何得知已知的二氧化碳濃度?我從以下文章看到作法
A Prototype Carbon Dioxide (CO2) Indoor Air Quality Monitor with Digital Display and SD Card Data Logger for under £55
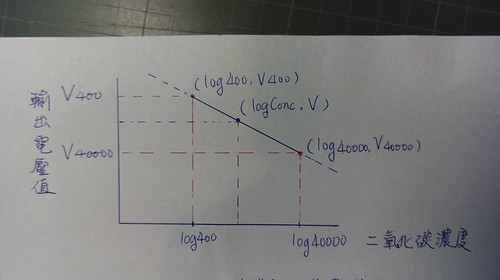
可用室外空氣和人體呼氣來進行校正,室外空氣的二氧化碳濃度是400ppm,而人體呼氣的二氧化碳濃度是40000ppm(4%),所以我只要用上頭那個程式碼去偵測這兩個濃度時,感測器的輸出電壓是多少就可以計算了。
說是簡單,但校正其實挺費時的。
1.上傳讀出A0數值的程式碼
2.把3.3v接入A0,看看呈現的數值是否穩定,應該要是(3.3/5)*1024=675.84,約是676左右。
3.讓讓感測器進入穩定的狀態,擺在無人房間內運作至少48小時,在讀值前至少讓元件加熱兩小時。
4.確保房間無人且通風,此時測出的類比值為400ppm的數值
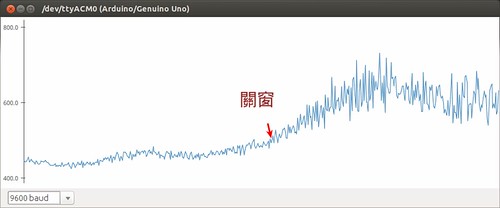
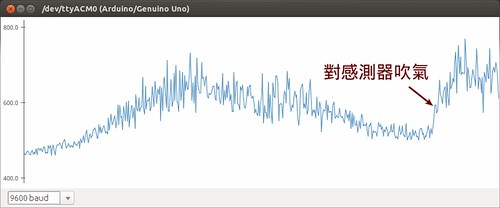
5.準備一個大型塑膠袋,把感測器不關機放入塑膠袋裡,利用吹管向裡頭吐氣,記得封好塑膠袋口,避免環境氣體進入。五分鐘後,看看讀值是否穩定,此為40000ppm下的讀值。
有了這兩個數值之後,就可以進行校正了,公式計算就如下面幾張圖所示
在這兩個網頁中,都有校正二氧化碳的程式碼,可以參考
http://www.dfrobot.com/wiki/index.php/CO2_Sensor_SKU:SEN0159
http://www.veetech.org.uk/Prototype_CO2_Monitor.htm
我根據我這邊的程序修改第一個網址裡的程式碼,如下所示,如需重新校正,只要更改下面(984)和(745)裡的數值。當發現感測器測量室外空氣,沒有辦法得到400ppm左右的數值,就需要重新校正了。
#define         V400        (984)                 //測量室外空氣得到的AnalogValue(400ppm)
#define         V40000   (745)                  //測量呼氣得到的AnalogValue(40000ppm)
程式碼可由此下載,或是下面複製貼上
另外,以下兩篇也有提及分析方式,
==============================
/*******************Demo for MG-811 Gas Sensor Module V1.1*****************************
Author:  Tiequan Shao: tiequan.shao@sandboxelectronics.com
         Peng Wei:     peng.wei@sandboxelectronics.com

Lisence: Attribution-NonCommercial-ShareAlike 3.0 Unported (CC BY-NC-SA 3.0)

Note:    This piece of source code is supposed to be used as a demostration ONLY. More
         sophisticated calibration is required for industrial field application.

                                                    Sandbox Electronics    2012-05-31

Modify by ChihhsiangChien
************************************************************************************/

/************************Hardware Related Macros************************************/
#define         MG_PIN                       (0)     //define which analog input channel you are going to use
#define         BOOL_PIN                     (2)
#define         DC_GAIN                      (8.5)   //define the DC gain of amplifier


/***********************Software Related Macros************************************/
#define         READ_SAMPLE_INTERVAL         (50)    //define how many samples you are going to take in normal operation
#define         READ_SAMPLE_TIMES            (5)     //define the time interval(in milisecond) between each samples in
                                                     //normal operation

/**********************Application Related Macros**********************************/
//These two values differ from sensor to sensor. user should derermine this value.
#define         V400        (984)                 //測量室外空氣得到的AnalogValue(400ppm)
#define         V40000   (745)                  //測量呼氣得到的AnalogValue(40000ppm)

/*****************************Globals***********************************************/
 float slope=(V40000-V400)/(4.602-2.602);
           //校正線的斜率計算
           //log40000=4.602
           //log400=2.602

int DisplayMode=2; //1是呈現資訊  2是只有二氧化碳濃度,可供Serial Plot
void setup()
{
    Serial.begin(9600);                              //UART setup, baudrate = 9600bps
    pinMode(BOOL_PIN, INPUT);                        //set pin to input
    digitalWrite(BOOL_PIN, HIGH);                    //turn on pullup resistors


}

void loop()
{
    int percentage;
    float analogValue;
    float volts;


    analogValue = MGRead(MG_PIN);
    volts=analogValue*5/1024;
    percentage = MGGetPercentage(analogValue);

if (DisplayMode==1){
    Serial.print(analogValue);
    Serial.print( "\t" );

    Serial.print(volts);
    Serial.print( "V" );
    Serial.print( "\t" );

    Serial.print("CO2:");
    Serial.print(percentage);
    Serial.print( "ppm" );
    Serial.print( "\t" );

    Serial.print( "Time point:" );
    Serial.print(millis());
    Serial.print("\n");
  }else{
    Serial.println(percentage);
  }

    delay(200);
}


/*****************************  MGRead *********************************************
Input:   mg_pin - analog channel
Output:  output of SEN-000007
Remarks: This function reads the output of SEN-000007
************************************************************************************/
float MGRead(int mg_pin)
{
    int i;
    float v=0;

    for (i=0;i<READ_SAMPLE_TIMES;i++) {
        v += analogRead(mg_pin);
        delay(READ_SAMPLE_INTERVAL);
    }
    v =v/READ_SAMPLE_TIMES ;
    return v;
}

/*****************************  MQGetPercentage **********************************
輸入讀入的AnalogValue,利用公式轉換成二氧化碳濃度
二氧化碳濃度的對數值與AnalogValue相關,
************************************************************************************/
int  MGGetPercentage(float analogValue)
{
     float logConc=2.602 +(analogValue-V400)/slope; //計算目前二氧化碳的濃度log值
      return pow(10,logConc );

}